Applying antifouling paint is one of the most important maintenance tasks for any boat owner. Proper preparation determines how well the coating adheres to the hull, how long it lasts, and how effectively it protects against marine growth. Skipping or rushing preparation can lead to premature paint failure, increased fuel consumption, and expensive repairs.
This guide explains every step required to prepare a boat for antifouling, from hauling the vessel out of the water to the final inspection before painting.
Why Proper Preparation Matters
Antifouling paint performs best when applied to a clean, dry, and properly prepared surface. Dirt, salt deposits, oxidation, grease, moisture, or loose paint can significantly reduce adhesion and shorten the service life of the coating.
Proper preparation offers several important benefits:
- Improved paint adhesion
- Longer-lasting protection
- Reduced marine growth
- Better fuel efficiency
- Higher boat performance
- Lower long-term maintenance costs
Step 1 – Haul the Boat Out of the Water
Begin by safely lifting the boat using a travel lift, crane, or trailer. Position the vessel securely so the entire hull is accessible. Allow excess water to drain before starting the cleaning process.
Cleaning the hull immediately after haul-out makes removing marine growth much easier because algae and barnacles have not yet hardened.
Step 2 – Pressure Wash the Hull
Use a pressure washer to remove slime, algae, barnacles, mud, salt deposits, and loose antifouling paint. Washing the hull immediately after lifting the boat significantly reduces the amount of scraping and sanding required later.
Avoid directing high-pressure water at sensitive components such as transducers, shaft seals, rubber fittings, and through-hull equipment.
Step 3 – Inspect the Hull Carefully
Once the hull is clean, inspect every section for damage before continuing.
- Blisters
- Cracks
- Gelcoat damage
- Deep scratches
- Osmosis signs
- Corrosion around metal fittings
- Peeling antifouling paint
Repairing these issues before painting helps maximize the lifespan of the new coating.
Step 4 – Repair Surface Damage
Fill scratches, repair damaged gelcoat, replace deteriorated fairing compound where necessary, and sand all repaired areas until smooth. Never apply antifouling paint over structural damage or repairs that have not completely cured.
Step 5 – Identify the Existing Antifouling
Before sanding or repainting, determine which type of antifouling is already on the hull.
Common coating types include hard antifouling, self-polishing antifouling, and hybrid coatings. Applying incompatible products may result in peeling or poor adhesion. If the previous coating is unknown, consult the paint manufacturer’s compatibility chart or apply a suitable primer.
Step 6 – Sand the Hull Properly
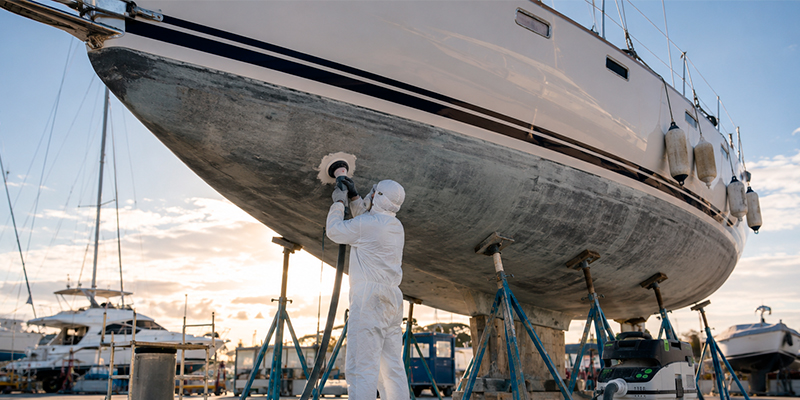
Sanding creates the surface profile required for excellent paint adhesion. If the previous coating is in good condition, light sanding is usually sufficient. Older hulls with multiple paint layers may require more aggressive sanding or complete paint removal.
Use an orbital sander equipped with dust extraction whenever possible. This produces a more consistent finish while minimizing airborne antifouling dust.
Large sailboats and cruising yachts can require many hours of sanding, making the process physically demanding. Equipment designed specifically for hull preparation can greatly reduce operator fatigue. For example, SailMotive has developed an Orbital Sander Lift that supports the weight of the sander while maintaining consistent pressure against the hull. This allows for smoother sanding, improved surface consistency, and more comfortable operation during extended antifouling preparation.
Step 7 – Remove All Sanding Dust
After sanding, thoroughly vacuum the hull and wipe the surface with clean microfiber cloths or the solvent recommended by the paint manufacturer.
Even a thin layer of dust can reduce coating adhesion and affect the final finish.
Step 8 – Mask Areas That Should Not Be Painted
Use high-quality masking tape to protect components that should remain free of antifouling paint.
- Waterline
- Trim tabs
- Anodes
- Through-hull sensors
- Log transducers
- Propellers unless using a dedicated propeller coating
Step 9 – Apply Primer if Required
Primer may be necessary when bare fiberglass is exposed, repairs have been completed, aluminum surfaces require protection, or the new antifouling is incompatible with the previous coating.
Always allow the primer to cure according to the manufacturer’s specifications before applying antifouling paint.
Step 10 – Check Weather Conditions
Environmental conditions play a major role in coating performance. Paint should generally be applied during dry weather with moderate temperatures and low humidity. Avoid painting in direct sunlight, strong winds, or when rain is expected before curing is complete.
Step 11 – Perform a Final Inspection
Before opening the paint, verify that:
- The hull is completely dry.
- No sanding dust remains.
- All repairs have fully cured.
- Primer is ready for recoating if used.
- Masking tape is secure.
- The surface is clean and smooth.
Taking a few extra minutes for a final inspection often prevents costly mistakes during painting.
Safety Tips During Preparation
Antifouling coatings and sanding dust often contain biocides and fine particles that require appropriate personal protection.
- Wear a certified respirator.
- Use safety goggles.
- Wear chemical-resistant gloves.
- Use protective clothing.
- Collect sanding dust for proper disposal.
- Follow local environmental regulations.
Common Mistakes to Avoid
- Painting over dirt or salt deposits
- Skipping sanding
- Applying incompatible coatings
- Painting onto damp surfaces
- Ignoring gelcoat damage
- Leaving sanding dust on the hull
- Painting during unsuitable weather
- Applying coats that are too thick or too thin
Essential Tools for Antifouling Preparation
- Pressure washer
- Marine scrapers
- Orbital sander
- Dust extraction vacuum
- Sandpaper
- Marine filler
- Solvent cleaner
- Masking tape
- Paint rollers
- Mixing sticks
- Respirator
- Protective gloves
- Safety glasses
- Protective coveralls
Frequently Asked Questions
Do I need to remove all old antifouling paint?
No. If the existing coating is well bonded and compatible with the new paint, light sanding is usually sufficient.
Can I apply antifouling without sanding?
Generally no. Sanding provides the mechanical profile needed for proper adhesion.
Should the hull be completely dry before painting?
Yes. Moisture trapped beneath the coating can lead to blistering and premature coating failure.
When should I pressure wash the hull?
Ideally immediately after haul-out while marine growth is still wet and easy to remove.
Is specialized sanding equipment worth using?
For larger boats, absolutely. Systems that support the sander and maintain consistent pressure improve surface quality, reduce physical strain, and make long sanding sessions much more efficient.
Conclusion
Proper preparation is the foundation of a successful antifouling job. Cleaning, inspecting, repairing, sanding, and carefully preparing the hull ensures maximum paint adhesion and long-lasting protection against marine growth. By following each step methodically and using the right tools, boat owners can improve vessel performance, reduce maintenance costs, and extend the service life of their hull coating for seasons to come.